We finally got an Anthropology in Little Rock last year. It was exciting times in our little city. I went down and checked out the store. Cute clothes and amazing decorations.
I was in heaven.
And then, I saw this mirror. And I fell in love. I kind of have a small, itty bity obsession with mirrors.

And then I saw the price tag. $488? No thank you.
And then I immediately thought, I can make that myself.
It took me a while to finally give it a go, but I'm glad I did.
I started by searching for old frames. I found two for $1.50. Then, to supplement the frames, I bought some small egg and dart molding and some scalloped molding at Michaels for $3.00 each. We've done so many molding-related projects that we have a large collection of it left over. So I used that as well.

We bought a mirror at Michaels too for $5.00. ($488 bucks my butt.)
And, because we are just like this, we also had leftover pieces of MDF (medium density fiberboard) that were big enough. I wanted the frame to be close to the size of the one I saw at Anthropology. The mirror I bought was about 15 inches across and then I added 4 inches all the way around to make it about 23 inches (theirs was 24 inches, close enough). We drew a circle using the string method and cut it out with a jigsaw.

(Do not try this at home.)
We also have a lot of stain left over from random projects, so I used that to stain each piece a different color. To make the colors go further and look different, I left it on each piece for different lengths of time. So even though I ended up with four different colors, I only used two colors of stain and left some natural.

Brad cut everything down into 2-3 inch sections. We left the corner pieces of the frames intact and they looked really cool.

I freaked out during much of this because I'm convinced he's going to cut off a finger one day. (Also, check out the awesome table we built!)

(See the cute rope molding? That's left over from the
crown on the kitchen cabinets)
Sand the circle.

I painted the MDF a dark brown (left over from the doors in the house). and glued the mirror down with mirror adhesive. (it's a type of liquid nails, found in the caulk section)

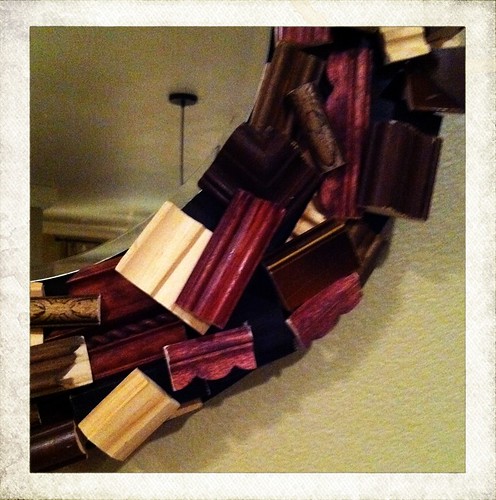
Then start layering the pieces on. You want to keep everything close enough together that you cover up most of the frame, but you want to spread it out enough that you see each layer.

I also tried to make sure that I kept colors away from each other too much and spread out the 'interesting pieces' like corners, angled cuts and some that I had fewer of.
This is the dry run I did a few days before. Not bad, but I wanted it to be fuller.

See the white primer? That's why I painted it a dark color. Once I had a few the way I liked them, I gorilla glued them into place. I kind of thought I might use the nail gun to help hold them down, but I never did.

That glue? Is not going anywhere.

Total cost? About $20. But mostly because we had a ton of the supplies already.

Do you want one? I have enough supplies left over to do a second one. Imagine that. And I'm thinking about opening an Etsy store to sell it. Just curious if anyone is interested. But, instead of $488 (or the now low, low sale price of $299) I was thinking around $100 because it is kind of time intensive.
Or? You could just make one of your own.