Showing posts with label projects. Show all posts

8.19.2011

Restore and After

I've made it no secret that I've been bored lately. Bored mixed with anxious. On a normal day, I can't sit still for 20 minutes, but lately? Three is pushing it. I need an outlet for my energy and projects to help pass the time.
I found out about a project called "Restore and After" it's an auction benefitting Habitat for Humanity. The way it works is people in the community volunteer to buy and rehab something purchased at a Habitat Restore location then donate it to HFH. These items are then auctioned off and the proceeds go to help build houses. The event takes place September 29 from 6-9 p.m., the tickets are $25 each. (so, you know, think about going!)
I've purchased items from the Restore before and here, the North Little Rock location has a much better selection than the one in Benton. But, Benton is closer so I've gone there more frequently. There were several great pieces I would have loved to rehab, but seeing as I'm not working, I could only afford to buy a small one.
I bought this table:

Hanging out in the back of the Cube.
It's large enough to either be a coffee table for a smaller room, an end table or even a night stand. Initially I couldn't decide if I wanted to do a practical rehab or a more fun/artistic one. Practicality got the best of me, I decided to go with a shabby white paint paired with a dark stained top.

I started by sanding it all down. Since the top was going to be stained, I had to get all the poly and stain off of it. Not going to lie, that took a while.

But isn't it so pretty? Better already.
Since the side boards were veneer and not solid, I didn't want to try to get all the stain off, so I just scuffed it up enough for the primer to take hold. I knew I would eventually be scuffing off the white paint on the feet, so I sanded it down well so that it would take the stain.
 
 After I sanded, I put down a layer of wood conditioner. THIS IS A CRUCIAL STEP. Seriously, it will make your piece look so much better. Otherwise the stain might not absorb evenly and your beautiful new piece will have splotches. If you don't have wood conditioner, just wipe it down with a layer of water (not a ton, just enough to dampen the wood. Wait for it to dry a bit then stain.) After that, layer on the stain. I used two layers on the top. Long even brush strokes work best. A sponge brush works best, no bristle marks. I've found, if you have a spot that's too dark, brush on more stain and then immediately wipe off. You might have to work it a bit to get it even, but it helps.
Stain: Minwax American Walnut
Since the bottom was going to be painted, I didn't bother with poly on it, but the top? It has the potential to hold cups with water rings or ink pen marks or little kids, so I topped it with four coats of clear gloss polyurethane. It shines so beautifully.
Next came the primer; two layers followed by three layers of paint.

Paint: Valspar Antique white off the shelf at Lowe's.
 Then the scuffing. I almost felt bad messing up the perfect paint job.

  But then I decided it looked better like this. In addition to the paint and stain, I replaced the hardware, with two new sleeker knobs from Home Depot as well as added new magnets to keep the doors closed.


Overall, I think it was a success. Hopefully someone will be excited to take this home.

Before
After
If you have some time [and you're local] and want to rehab a piece, follow them @Restoreandafter on twitter or, let me know and I can get you in touch with someone. Or, just head out to your local Habitat Restore and buy something for yourself. It's a great organization that helps the community, plus you have the added bonus of keeping something out of a landfill and saving yourself some money on a nice piece of furniture, not some particle board junk. (seriously? This table is HEAVY.)


The Lettered Cottage

7.20.2011

SWW: Spare Bedroom

While I can't actually do much with the other bedroom, I have been collecting pieces. Since I'm not working, I'm really forced to do this 'on the cheap.'


Tall lamp-free and repainted
Round lamp- $10 Target, repainted
Lampshades- $3.24/each Target sale
Mirror-$4 and repainted
Picture-$5 (painted myself)


I even managed to throw a little paint on the wall.
Behr paint "Dove" $24 (will probably need a second gallon)


Bedspread from Target. $18
(This time of year is great to buy cheap bedding, right before school starts)


Will be pillows. Yes, I have a sewing machine. Be afraid. I am
Material $10, Garden Ridge

7.13.2011

SWW: More Bakery

Yesterday we drove three hours (and three hours back) to Springdale to pick up this guy. While waiting, I kept warning Brad 'this will be a big mixer.' Seeing as he didn't believe me with the oven.
So when the guy came out with this:


Even I was taken back by the size. It's huge. Bigger than I thought, and older. Older meaning it's a SOLID CAST IRON model.

We're lovingly referring to it as 'The Tank.'

In softer news, I'm currently painting this (table for coffee):


This color:


It's from my logo. (I'll post more about the table later)

Speaking of logo. Want to see it?


Thought you would.

6.07.2011

Laundry

We're running out of rooms in the house that need work. The laundry room is one that Brad has been trying to finish for a while. I was in a state of 'not there yet.' On certain creative type things, I find that I'm not always ready to just jump head long into them. I'm just not ready. The ideas aren't solid. The motivation not there.
But finally, I broke down and we started working. Our laundry room is "L" shaped, with the shorter part of the L going under the stairs to the bonus room (another room that needs work). When we had the floor plans drawn out, we didn't give the laundry room much thought. The guy drew the washer and dryer on the long wall in the middle under the window. Good enough, right?
No. Not right, terrible. Awful placement. Wrong. Wrong. Wrong.
But it's far too late to do anything about that. But next time? I will think long and hard about how the laundry room will be laid out.
Brad's mom had some old '70s wicker front storage boxes that stacked together in her garage that she didn't want anymore. We snagged them and ripped off the terrible doors, leaving us with solid wood boxes.
There were six total, so we stacked them three high and made two cabinet and set them into the corners.
Using luan and pine, we made four doors. We wanted them to be light (hence the luan), but we wanted the doors to have structure, the pine provided that. Brad and I both like the simple look of these framed doors.
We went back and forth over what to do with the empty space between the cabinets. Leave it open? Put a small bar in there to hang clothes? We ended up placing shelves that originally went inside the boxes, just cut down to fit.
On the other side of the room, we used a left over cabinet that was originally purchased for the master bathroom. (Once we got them painted, we decided we wanted something nicer in there so one cabinet is in the garage for storage, this is the other one.)
We built an extension to create a cubby for the trash can and supports to hold the tile counter top.
We had some of the 13 inch tiles left over from our shower (they also match the 24 inch floor tiles) so we used that for the countertop.
We also topped this area with two open shelves. The same style we used in the guest bedroom.
Back on the other side, we topped the cabinets with a piece of wood and a leftover piece of crown molding. The whole thing got a coat of our signature antique white paint.
Baskets from Garden Ridge helped pull everything together. Usually, I'm not a huge fan of red. Everything else in our house is some shade of blue. But when I saw the baskets, I decided that a pop of red just might be what the laundry room needed.
Except, it still felt a bit blah. So I suggested a stripe. Brad was on board. Then I suggested two stripes. He was still on board.
The last time we did stripes (also in guest bedroom), we tried the glaze trick to keep the stripes from seeping under the tape. It did not work. A commenter suggested painting the wall color over the tape then the stripe color. Bingo! It totally worked. So if you ever stripe, you must, must, must do that!
Since so much of this room was things we already had (the boxes from his mom, the left over cabinet from the bathroom, my 'paintings' from my office at work, the crown molding) we didn't spend a ton, roughly $150. This was the cost of the doors, the shelves, paint for the stripes and mastic for the tile.)
I've also got a piece of fabric I grabbed at Garden Ridge (hello, $5 for 3 yards?) that matches the red perfectly. At some point, I'm going to attempt to make a Roman shade for the window. Fingers crossed, because I don't really sew. 

3.29.2011

Anthropology inspired mirror

We finally got an Anthropology in Little Rock last year. It was exciting times in our little city. I went down and checked out the store. Cute clothes and amazing decorations.
I was in heaven.
And then, I saw this mirror. And I fell in love. I kind of have a small, itty bity obsession with mirrors

And then I saw the price tag. $488? No thank you.
And then I immediately thought, I can make that myself.
It took me a while to finally give it a go, but I'm glad I did.


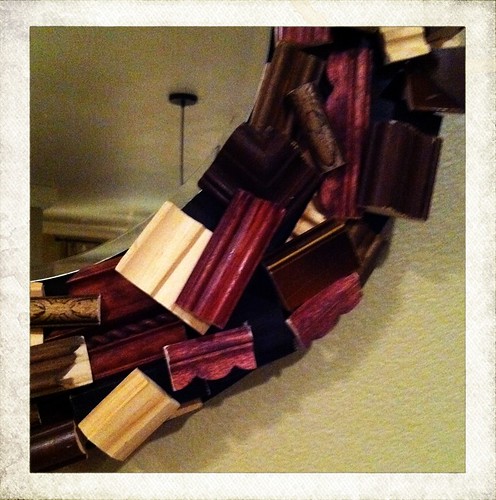
I started by searching for old frames. I found two for $1.50. Then, to supplement the frames, I bought some small egg and dart molding and some scalloped molding at Michaels for $3.00 each. We've done so many molding-related projects that we have a large collection of it left over. So I used that as well.


We bought a mirror at Michaels too for $5.00. ($488 bucks my butt.)

And, because we are just like this, we also had leftover pieces of MDF (medium density fiberboard) that were big enough. I wanted the frame to be close to the size of the one I saw at Anthropology. The mirror I bought was about 15 inches across and then I added 4 inches all the way around to make it about 23 inches (theirs was 24 inches, close enough). We drew a circle using the string method and cut it out with a jigsaw.


(Do not try this at home.)

We also have a lot of stain left over from random projects, so I used that to stain each piece a different color. To make the colors go further and look different, I left it on each piece for different lengths of time. So even though I ended up with four different colors, I only used two colors of stain and left some natural.


Brad cut everything down into 2-3 inch sections. We left the corner pieces of the frames intact and they looked really cool.


I freaked out during much of this because I'm convinced he's going to cut off a finger one day. (Also, check out the awesome table we built!)


(See the cute rope molding? That's left over from the
crown on the kitchen cabinets)

Then I had to sand everything down. That was NOT fun. But the sun was shining, so I didn't mind hanging out on the deck. I also had Brad cut down several pieces of MDF and I used those as filler. I hated the idea of cute molding being hidden under other molding, so I wanted the MDF to give it dimension as well as keep cost down.

Sand the circle.

I painted the MDF a dark brown (left over from the doors in the house). and glued the mirror down with mirror adhesive. (it's a type of liquid nails, found in the caulk section)


Then start layering the pieces on. You want to keep everything close enough together that you cover up most of the frame, but you want to spread it out enough that you see each layer.


I also tried to make sure that I kept colors away from each other too much and spread out the 'interesting pieces' like corners, angled cuts and some that I had fewer of.

This is the dry run I did a few days before. Not bad, but I wanted it to be fuller.


See the white primer? That's why I painted it a dark color. Once I had a few the way I liked them, I gorilla glued them into place. I kind of thought I might use the nail gun to help hold them down, but I never did.


That glue? Is not going anywhere.


Total cost? About $20. But mostly because we had a ton of the supplies already.


Do you want one? I have enough supplies left over to do a second one. Imagine that. And I'm thinking about opening an Etsy store to sell it. Just curious if anyone is interested. But, instead of $488 (or the now low, low sale price of $299) I was thinking around $100 because it is kind of time intensive.

Or? You could just make one of your own.

3.18.2011

Nightstands

After building our bed, we needed nightstands to go with it. We found these end tables and thought they would work. (Seen at the end of this post) Remember the terrible blue lamps? These were just as bad.
They didn't work. At all. But we kept them, because that's what you do.
A few weeks ago we stumbled upon some nightstands at Carries (my fav place). They were priced separately at $12.50 each. Why they weren't selling them as a set is beyond me. Obviously we grabbed both. I wasn't really sure about them in the beginning.
So, they were pretty cheap and despite being solid wood, we did the unthinkable and painted them! I'm pretty sure I paint everything that enters my home antique white (premixed from Lowes!)

Here they are after Brad had given them a good sanding. (Because I'm a bad blogger and forget to get crappy before pictures.)

They had these really terrible Asian inspired drop/hanging handles that Brad thankfully had already taken off. Seriously, they were not cute.

While I love the clean lines of the fluted trim down the side,


I did not love the terrible Hawaiian looking carved inlay thing on the top drawers. It felt so dated and not in a good way.


So, we cut down a piece of thin luan wood and covered it up! we gorilla glued them in place then added a few small nails (via nail gun) just in case.


Then we used a bead of caulk to smooth the edges. We also drilled the hole for the knob.

Both of the stands got three coats of primer followed by three coats of paint. The entire time Brad lectured me about how I should have done that with the dresser. And I didn't. Yada, yada, yada.

They turned out nice.

So here it is now beside my unmade bed.


They just look so much happier. The white is cleaner and the knobs are more simple. (BTW, we found a 4 pack of Oil Rubbed Bronze knobs at Home Depot for $5.00. I really like using cute/decorative knobs on smaller projects like this, but this package had the exact amount so I caved to Brad when he pointed them out.)

Happy Friday! I have another project that I've been working on and I can't wait to show you. Here's a hint: It's an Anthropology knock off.

3.10.2011

Lamps

Brad and I built these two tables that flank our entertainment center. They made a good place to put lamps. But the entertainment center is so tall that the lamps couldn't be small. So we bought these:


And we painted them blue. And then I decided I didn't like them. So here is a step-by-step process of turning these blue lamps into some pretty wooden lamps.

Step #1:
Throw away the blue lamps. They're hideous. No amount of spray paint will save them. (If you want to be smart about it, you could pull the harp, socket and other 'innards' out and reuse them. Or if you don't have horrible ugly lamps, just buy that new.)

Step #2:
Decide how big you want the lamps. We went with about 18 inches tall. We used a 6 inch wide piece of pine and 2 inch wide pieces for the side. We were looking to create a rectangle. You could go more square with yours, and as tall or as short as you like.


Step #3:
Notch a hole at the base of the backside of the lamp. This is for the cord. (You can see I have the boards numbered so I made sure everything from lamp 1 and lamp 2 did not get confused, in case they weren't the exact same measurements.


Step #4:
Start putting the pieces together. We used a combination of gorilla glue (because it rocks) and nails. Keep in mind where the seams will be. Ours were on the sides so that the front would be smooth.


Step #5:
Measure the base and the top.
You could go two ways with the top. On the bottom, we have a larger base cut from an 8 inch wide piece of pine. We cut it so that there was the same amount all the way around. Again, more or less, depending on what kind of look you're going for. Our top (not pictured here) fits snuggly into the hole on top. Don't forget to drill a hole for the top of the lamp!


Step #6:
Beat it up. This can be skipped. But we wanted them to look rustic. (Also why we chose pine, it's really soft and frankly, cheap)
Tools: Hammer, nails, chain. Have fun. I like to barely hammer the nail into the surface in small clusters to make it look like worm holes.


Step #7:
Stain to the desired color. Please note, wood conditioner is your friend! If you don't have it, water works fine as well. Basically it opens to pores so the wood will take the stain evenly. Very important if you're working with a dark color [like we are].

Step #8:
Before you attach the bottom, put all the lamp parts together. If you buy a kit, there are instructions, follow them. If you took your lamp apart, redo what you undid. Since my boxes are kind of narrow, I wasn't able to put my hand inside. I dropped a string through the top and then pulled the cord up. Make sure everything works!


Step #8:
Put on the bottom. I would suggest either nails or screws (but counter sink them so they don't scratch the table), that way if anything goes wrong, you can access the inside of the lamp. If you use gorilla glue just be prepared to throw it away. Seriously that stuff is strong.

Step #9:
Lamp shade!


Right now, the harp part of the lamp is sitting straight on the top of the box. It kind of looks like the lamp has no neck. Odd? Kind of. I'm not sure I like the look. I think I want a tiny bit of breathing room.

Oh, and pro tip? When you're picking out lamp shades. Even if they are the exact same size and they are stacked together. That does not ensure that they are in fact identical shades. And, if you take off all the wrapping and leave them up for two weeks before you notice it? You are stuck with them.